I think that continuity with your gifts to your little can turn a simple/basic gift, into a really 'wow' gift. I'm going to use the gifts my big gave to me as an example of using the same palate through all of the gifts.
I told her that I liked purple, solid colors (no patterns) and that's about it. And she ran with it. The main colors she used were a dark purple, light purple and gold. If you are going to use more than four colors, I think using one accent color per item is best and then for a couple items here use accent color 1 and a few items there use accent color 2.
My crate, pin box and 'hope' sign were only the 3 main colors, using mostly solid dark purple and middle stripes of the other colors. My letters were the light purple and twine. My paddle was dark and light purple, gold, wood and twine. My ribbon board was light purple and gold.
Notice how if there is a variant of the three color combination, it was picked up somewhere else. There was twine in at least two items.
When I made gifts for my little, since I used sparkle spray paint once, I found a way to use it in another item to make it look part of the same collection. Using the same paints in all of your crafting is the easiest way to make a set of gifts look part of the same collection and a lot more professional.
Take care and do good,
Sarah
Thursday, December 12, 2013

Tuesday, December 10, 2013
My Fabulous Skirt
So ignore the 'me' in the photo and just look at my skirt. I still want to alter the waistline to a more natural waist and not at my hips. There's also a cute bow that the picture doesn't show well. I'm still proud and I got an A.
Take care and do good,
Sarah

Monday, December 9, 2013
Sparkle Letters
For my little I wanted to make her cute wall letters and I wanted them to be a delta and gamma, not a DG. My own letters had twine wrapped around the bottom edge and I liked that. My little has a sparkly personality so I grabbed some spray glitter and went to work.
I spray painted the letters with the glitter spray which was a little different than the normal spray paint I'm used to. It was tricky getting an even coverage so I had to let it dry and put on two coats. I also paid attention to spraying the edges.
I had left over white fabric from her T-shirt and so I layered it over half of the letters. I had to cut the inside corners to allow the fabric to lay flat. I hot glued the fabric on the back. It took a lot because the fabric didn't adhere well.
I've attached a photo of mid-process step when I was making sure I had enough fabric. It was the only picture I took because of my crafting fail.
Take care and do good,
Sarah

I Made a Skirt
As I've mentioned before, I'm in a costume design class. For our final project we had to take a pattern from the store and make it. I chose a pencil skirt with peplum and bow. I had a bit of a stumble with the back vent and how to insert the zipper when it came to it, but overall, I'm pretty darn happy with myself.
I've joked with my sisters that have seen my progress that I'm going to model the skirt around. They think I'm joking. Haha, jokes on you sisters. I am. I'm mega proud and I have to model it in class anyway so before I leave for class I plan on walking through the hallways saying, "Look at me sisters. Like my skirt? Oh ya - I MADE IT." Again, I'm really proud of what I've done in this class.
I'll post a picture of my complete outfit tomorrow but before that I'll include the instructions for how to insert a zipper. I think my teacher explained it really well for a person who has never done it before.
Baste stitch (the longest/loosest stitch you can make, it's not permanent) the seam closed (I overlapped my seam 1/8 inch)
Glue or hand stitch the zipper, having the zipper teeth following the baste stitch (the glue comes out with washing)
Using a zipper foot (it means change the metal foot on the machine so it has room for the zipper), stitch the zipper to the fabric
Using a seam ripper (you can buy them individually or they sometimes come in emery kits) remove the baste stitch
As my teacher makes sure my class knows, good pressing is good sewing - so iron afterward.
Take care and do good,
Sarah
I've joked with my sisters that have seen my progress that I'm going to model the skirt around. They think I'm joking. Haha, jokes on you sisters. I am. I'm mega proud and I have to model it in class anyway so before I leave for class I plan on walking through the hallways saying, "Look at me sisters. Like my skirt? Oh ya - I MADE IT." Again, I'm really proud of what I've done in this class.
I'll post a picture of my complete outfit tomorrow but before that I'll include the instructions for how to insert a zipper. I think my teacher explained it really well for a person who has never done it before.
Baste stitch (the longest/loosest stitch you can make, it's not permanent) the seam closed (I overlapped my seam 1/8 inch)
Glue or hand stitch the zipper, having the zipper teeth following the baste stitch (the glue comes out with washing)
Using a zipper foot (it means change the metal foot on the machine so it has room for the zipper), stitch the zipper to the fabric
Using a seam ripper (you can buy them individually or they sometimes come in emery kits) remove the baste stitch
As my teacher makes sure my class knows, good pressing is good sewing - so iron afterward.
Take care and do good,
Sarah
Tuesday, November 26, 2013
My Little's Decoration
Well Initiation has come and gone and my little got her paddle. At first I didn't know how to decorate her paddle because mine was so awesome. My paddle is wrapped in fabric with twine wrapped around the end. I wouldn't even know how to start remaking it.
So I started with a coat of paint on my little's paddle. Then I added some other paint for definition. I positioned the crest, sparkle anchor and sparkle whale that way I could stencil in her name. When I was done with the second coats of paint I took a step back to see what else it needed. I had some small stick-on pearls that I thought about adding to the top and bottom but I quickly realized it'd be prettier all around the paddle. I felt like a jeweler setting stones because I used tweezers to take it off the plastic and stick it on the wood.
The paddle still needed something else. I had extra pearls and I had seen Braille done on other paddles so I decided to write her name in Braille using the pearls. I was finally happy with what I had made.
When I gave her the paddle she was really happy and liked it which made me feel great as her big.
Now I have to start making her a Christmas present....
So I started with a coat of paint on my little's paddle. Then I added some other paint for definition. I positioned the crest, sparkle anchor and sparkle whale that way I could stencil in her name. When I was done with the second coats of paint I took a step back to see what else it needed. I had some small stick-on pearls that I thought about adding to the top and bottom but I quickly realized it'd be prettier all around the paddle. I felt like a jeweler setting stones because I used tweezers to take it off the plastic and stick it on the wood.
The paddle still needed something else. I had extra pearls and I had seen Braille done on other paddles so I decided to write her name in Braille using the pearls. I was finally happy with what I had made.
When I gave her the paddle she was really happy and liked it which made me feel great as her big.
Now I have to start making her a Christmas present....
Take care and do good,
Sarah

Tuesday, October 22, 2013
Greek Letters from Pinterest
Here are some of my favorite letter designs that I've seen on Pinterest. Even though they're my favorites, I will probably never make them because of the time and skill it takes. But they're so cute!


Some of the ideas that I've gotten from these are actually fairly simple. A good coat of paint and a splash of color of bling can make cute letters. I would love to make blackboard letters and then draw on them with colored chalk. The rose letters I think would be mega cute with tiny cream rose buds on 4 inch letters, perfect for setting on a desk.
The cutest, but will probably never happen, letters are what I call the knitted letters. I love how homey they look and the possibilities are endless for what yarn color you use.
Anyway big/little reveal went great and my little loved all her gifts (I was so busy making them I forgot to take pictures for the how to #CraftingFail).
Take care and do good,
Sarah
Source: I planned on adding links to the how-to pages...but like a complete fail I exited out and couldn't find them again, sorry!


Some of the ideas that I've gotten from these are actually fairly simple. A good coat of paint and a splash of color of bling can make cute letters. I would love to make blackboard letters and then draw on them with colored chalk. The rose letters I think would be mega cute with tiny cream rose buds on 4 inch letters, perfect for setting on a desk.
The cutest, but will probably never happen, letters are what I call the knitted letters. I love how homey they look and the possibilities are endless for what yarn color you use.
Anyway big/little reveal went great and my little loved all her gifts (I was so busy making them I forgot to take pictures for the how to #CraftingFail).
Take care and do good,
Sarah
Source: I planned on adding links to the how-to pages...but like a complete fail I exited out and couldn't find them again, sorry!
Sunday, September 15, 2013
A Dream Girl's Dream Catcher
 I decided to make a dream catcher for me (or my potential little). I went to my local craft store and bought light brown suede lacing, brown waxed linen (or nylon) string, a metal (or wooden) hoop, beads and some feathers.
 Taking the hoop, wrap the suede lacing around. Tie a knot or use craft glue to keep the end at one spot of the hoop. Keep the lace flat and as close as possible. Because 2 yards isn't enough for a 6" hoop, I had to buy another 2 yards. Start the knot on the inside of an existing knot, on top of the lacing that's already woven around then knot by the other knot. This creates a hanging loop for the dream catcher as a whole. You can also knot side by side with a previous knot and continue the wrapping to the other knot. A let the glue set for a few hours before starting on the stringing process.

 Take the waxed string and tie a knot near the knot at the top. Then swoop it to the right a few inches and tie a knot on the inside of the hoop. After you get the first row of loops around the hoop, you can add beads as you loop (you can also knot) around the first row of loops. If you don't knot it, take the string with a bead over the first loop and then over the string with the bead to stop beads from sliding around too much. This is where you have fun!

 To tie it off, take the string after your last loop and tie a double knot. With the waxed linen string you can press it together and the wax helps the string stick to each other.
To add a feather, take a cut piece of string and tie a knot at the base. Loop the string through the feather's hole and bring the string to the back to tie in a double knot. Cut off the excess string.
Now you can hang it!

Take care and do good,
Sarah
Thursday, September 5, 2013
A Stitch in the Chain and RECRUITMENT TIME!
During a bored weekend I looked at some scrap pieces of fabric and blue thread that I had for some anther cross stitch project. The piece of aqua? light blue? fabric barely fit in my wire hoop but I got it to work. I started out with an anchor. Since I didn't have a fabric with distinct holes like I'm used too, I chose to stitch in what I call 'free hand,' which is just long singular stitches, not crossed.
I used 3 pieces of the darker blue thread for the anchor. I had to pause and think about how thick I wanted the anchor to be but I figured it out quickly. Looking at a single layer can help you determine how think you want it. After the base of the anchor I made the round top which was hard to do since I was working with straight lines. Then I added the top line, making note of the length to keep it even. I used the thread lines on the fabric to keep my lines straight though they were hard to count. I knew I'd have a hard time making a rounded points, so I made them go straight out from the base.
Using 3 pieces of the lighter blue thread, I tried to create a winding rope through the top hole and around the anchor. I found some white thread and used 1 strand to cross over the light blue rope. This added a nice look to the rope and gave a true nautical feel. Taking a strand of dark blue, light blue, and white I used this mixed color to create the waves at the top. I wish I could have done a better job with this element but straight lines don't make waves. Lastly I took 2 pieces of the light blue thread and make ∆ Γ to the left of the anchor. (I lost my picture and then I lost my anchor so I couldn't even retake the picture.)
I also recently found a website that had a lot of good tutorials and information called Needle 'n Thread. I also found a needlework shop in my town, which is just going to be dangerous, and am looking at their supplier which is Hoffman Distributing Company. There are a few anchor and nautical ideas that I'm thinking about getting.
From The Sunflower Seed, they had an Ichabod (my school mascot) and that's my current project. I also purchased letter patterns and plan to do a "Delta Gamma on the top and bottom of that fabric.
Alpha Kappa."
Another craft idea I've been thinking about is to get a white canvas board, light blue paint and dark blue paint. I have some Martha Stewart stencils that have a lot of nautical shapes which I'd do in a random order with the light blue paint. Then over the shapes I'd put "A champion in her absence and her friend always" since it's one of my favorite quotes. :)
Well it's recruitment time again and the crafts will start rolling out. I plan to do more sewing related gifts (that is if I get a little) due to the fact I'm in a costume design class. I snagged my mom's sewing machine and plan to become a stitching fool. My French seam is pretty good if I do say so myself - which I do say so.
Take care and do good,
Sarah
I used 3 pieces of the darker blue thread for the anchor. I had to pause and think about how thick I wanted the anchor to be but I figured it out quickly. Looking at a single layer can help you determine how think you want it. After the base of the anchor I made the round top which was hard to do since I was working with straight lines. Then I added the top line, making note of the length to keep it even. I used the thread lines on the fabric to keep my lines straight though they were hard to count. I knew I'd have a hard time making a rounded points, so I made them go straight out from the base.
Using 3 pieces of the lighter blue thread, I tried to create a winding rope through the top hole and around the anchor. I found some white thread and used 1 strand to cross over the light blue rope. This added a nice look to the rope and gave a true nautical feel. Taking a strand of dark blue, light blue, and white I used this mixed color to create the waves at the top. I wish I could have done a better job with this element but straight lines don't make waves. Lastly I took 2 pieces of the light blue thread and make ∆ Γ to the left of the anchor. (I lost my picture and then I lost my anchor so I couldn't even retake the picture.)
I also recently found a website that had a lot of good tutorials and information called Needle 'n Thread. I also found a needlework shop in my town, which is just going to be dangerous, and am looking at their supplier which is Hoffman Distributing Company. There are a few anchor and nautical ideas that I'm thinking about getting.
From The Sunflower Seed, they had an Ichabod (my school mascot) and that's my current project. I also purchased letter patterns and plan to do a "Delta Gamma on the top and bottom of that fabric.
Alpha Kappa."
Another craft idea I've been thinking about is to get a white canvas board, light blue paint and dark blue paint. I have some Martha Stewart stencils that have a lot of nautical shapes which I'd do in a random order with the light blue paint. Then over the shapes I'd put "A champion in her absence and her friend always" since it's one of my favorite quotes. :)
Well it's recruitment time again and the crafts will start rolling out. I plan to do more sewing related gifts (that is if I get a little) due to the fact I'm in a costume design class. I snagged my mom's sewing machine and plan to become a stitching fool. My French seam is pretty good if I do say so myself - which I do say so.
Take care and do good,
Sarah
Tuesday, December 4, 2012
Do I see an Anchor on your tree?
It's Christmas time, which means how do I give presents to my 'family' members without going overboard - on price and items. I decided to make my own ornaments for my big, twin, and niece.
Originally I wanted to get larger ornaments than the ones I got and put charms particular of Delta Gamma and the person inside. Once I got to the store I realized that the number of charms I wanted and how much money I had wasn't going to work out.

So here is what I did get, it's all from Hobby Lobby.
Small clear ornaments, thin blue ribbon, anchor charms, bronze beads, pink pearls, and white pearls.
I tried to use an even amount of beads per ornament (I only made 3, if you want to make more then you definitely need to buy more pearls). There are many other options you can do for each sorority with color and charm variations.
I looped the ribbon through the ornament, cut at whatever length you want. Then I slide the anchor charm down and tied the top.
It's a pretty easy gift idea for yourself or others and it literally took me less than 10 minutes to do. The hardest part was getting the ribbon through the anchor charm.
The ribbon spool was a good holder for the ornaments while I worked.
 I also had leftover ribbon that I just filled another ornament til it was at a fullness that I liked. Since I wished I had a different ribbon, I didn't use it to make a loop. When I get home for the holidays I'll just find hook that isn't being used to hang it on the tree. I had one anchor charm left and I used the metal twist tie that kept the charms on the packaging to tie it to the top of the ornament.
Take care and do good for the holidays,
Sarah
Originally I wanted to get larger ornaments than the ones I got and put charms particular of Delta Gamma and the person inside. Once I got to the store I realized that the number of charms I wanted and how much money I had wasn't going to work out.

So here is what I did get, it's all from Hobby Lobby.
Small clear ornaments, thin blue ribbon, anchor charms, bronze beads, pink pearls, and white pearls.
I tried to use an even amount of beads per ornament (I only made 3, if you want to make more then you definitely need to buy more pearls). There are many other options you can do for each sorority with color and charm variations.
 |
| These are filled ornaments. The one on the left is complete. |
It's a pretty easy gift idea for yourself or others and it literally took me less than 10 minutes to do. The hardest part was getting the ribbon through the anchor charm.
The ribbon spool was a good holder for the ornaments while I worked.

Take care and do good for the holidays,
Sarah
Saturday, December 1, 2012
A Work in Progress
So I decided to start a cross stitch wall hanging for me or my future little. Too bad there aren't any good patterns that I could find. I did what my grandma does and got out some graft paper and a pretty image.
...it has been a bit tedious transferring the words but I'm almost done with the pattern. Then I'll go to Hobby Lobby or some place like that to get blue thread and hopefully some tan or worn dotted fabric. I plan to use 3 threads for the outline of the letters and 2 threads for everything else.
I'll put up more pictures and tips as I work on this. I'm not a fast cross stitcher but I love it.
Take care and do good,
Sarah
 |
| Here is what I want it too look like in the end |
 |
| And here is what it looks like on the graft paper |
...it has been a bit tedious transferring the words but I'm almost done with the pattern. Then I'll go to Hobby Lobby or some place like that to get blue thread and hopefully some tan or worn dotted fabric. I plan to use 3 threads for the outline of the letters and 2 threads for everything else.
I'll put up more pictures and tips as I work on this. I'm not a fast cross stitcher but I love it.
Take care and do good,
Sarah
Friday, October 26, 2012
10 Shirt Ideas I Want to Make
I know it's been a while, but hey - I'm in college and in a sorority, time can be limited. So I thought, why not write down my 10 top shirt ideas that I want to do...whenever I find time that is.
1. An anchor cut-out of a white shirt that has my school mascot sown over a pink short sleeve t-shirt. The anchor would be tilted a bit.
2. DG cut out from an anchor print, about 5 or so inches tall sown over a white short sleeve t-shirt. The letters would probably be at the bottom of the shirt on the right side.
3. Cut out DG from a blue fabric, then cut it out again only slightly larger from a pink fabric. Center the letters over each other, machine sew them on but hand sew over in a fun thread color.
4. Cut out 'I' '♥' and 'DeltaGam' from your favorite color or print. Sew it on in an 'I heart NYC' style or diagonal on to a shirt that goes well with your color/print. Maybe even an anchor on a back corner.
5. Take a size bigger striped shirt (I'm thinking blue and white?) and cut out a large large more decorative anchor out of a red fabric. Sew on the anchor towards the bottom right corner. Then cut the shirt into a one shoulder top and tie down the side opposite of the anchor.
6. Though this idea isn't entirely crafty and probably costs more than I'd like to think, but I've really wanted a razorback athletic shirt with DG embroidered on the back strap.
7. Another athletic shirt idea that is easier but I'm not sure how well it would hold up is getting an athletic shirt of your preference, buying iron-on letters and on the back bottom of the shirt spell Delta Gamma.
8. Similar to the I heart DeltaGam shirt, but instead of a heart some of my sisters have used a small anchor and always think it's so cute.
9. Recently some of my sisters also got a quarter-zip sweatshirt and cut out DG and an anchor out of Vera Bradley fabric. The letters were big and professionally sewed on the chest and the anchor was smaller and was sewn over their left shoulder/chest.
10. The name of my school is long and I've thought about cutting out DG over the title, spaced fairly close together. This would be similar to my first idea because I want a DG shirt but on game day I also want to support my school.
If you want you could even leave comments as to what idea you liked best/least or some color ideas.
Take care and do good,
Sarah
 |
| My mascot isn't cool but it can work better for others |
2. DG cut out from an anchor print, about 5 or so inches tall sown over a white short sleeve t-shirt. The letters would probably be at the bottom of the shirt on the right side.
3. Cut out DG from a blue fabric, then cut it out again only slightly larger from a pink fabric. Center the letters over each other, machine sew them on but hand sew over in a fun thread color.
4. Cut out 'I' '♥' and 'DeltaGam' from your favorite color or print. Sew it on in an 'I heart NYC' style or diagonal on to a shirt that goes well with your color/print. Maybe even an anchor on a back corner.
 |
| Purple and blue are my favorite colors |
6. Though this idea isn't entirely crafty and probably costs more than I'd like to think, but I've really wanted a razorback athletic shirt with DG embroidered on the back strap.
7. Another athletic shirt idea that is easier but I'm not sure how well it would hold up is getting an athletic shirt of your preference, buying iron-on letters and on the back bottom of the shirt spell Delta Gamma.
8. Similar to the I heart DeltaGam shirt, but instead of a heart some of my sisters have used a small anchor and always think it's so cute.
9. Recently some of my sisters also got a quarter-zip sweatshirt and cut out DG and an anchor out of Vera Bradley fabric. The letters were big and professionally sewed on the chest and the anchor was smaller and was sewn over their left shoulder/chest.
10. The name of my school is long and I've thought about cutting out DG over the title, spaced fairly close together. This would be similar to my first idea because I want a DG shirt but on game day I also want to support my school.
If you want you could even leave comments as to what idea you liked best/least or some color ideas.
Take care and do good,
Sarah
Monday, September 24, 2012
Painted D G letters
All of my sisters had taken on littles except me this fall so when they started crafting I wanted to join. I called it practice...by making things for myself. :)
Need: cardboard letters (about 1 cm thick), acrylic paint, thin and medium brushes, a swirly doodles stencil, fun stick on letter stencil, & stick on small pearls
 (I got everything at Hobby Lobby)
 First I mixed some white and purple paint to get a light purple color. I painted a layer over the top and along the inside edge. Then I added a bit more purple to my mix and painted the outside edge. To give the top some texture, when my brush was almost out of paint, I lightly brushed over the top. It could also be done with a sponge if you want.
Then I placed my stick on letter stencils where I wanted and traced it with a pencil. I used my straight purple color to paint within the lines.
 I place the corner swirly stencil and traced it at the corners. I added some indigo paint to my purple to give it a lightly darker look.
After letting it dry I added small pearls to the tips of the swirls. (Which you can't really see in the picture)

Need: cardboard letters (about 1 cm thick), acrylic paint, thin and medium brushes, a swirly doodles stencil, fun stick on letter stencil, & stick on small pearls
 (I got everything at Hobby Lobby)
 First I mixed some white and purple paint to get a light purple color. I painted a layer over the top and along the inside edge. Then I added a bit more purple to my mix and painted the outside edge. To give the top some texture, when my brush was almost out of paint, I lightly brushed over the top. It could also be done with a sponge if you want.
Then I placed my stick on letter stencils where I wanted and traced it with a pencil. I used my straight purple color to paint within the lines.
 I place the corner swirly stencil and traced it at the corners. I added some indigo paint to my purple to give it a lightly darker look.
 |
| I had the corner swirls be opposite |
After letting it dry I added small pearls to the tips of the swirls. (Which you can't really see in the picture)

It took some time and a steady hand for when you paint in the lines, but I was very happy with my first try at making letters. It's very simple but is a little classy also.
Take care and do good,
Sarah
Friday, September 21, 2012
Welcome DG's! Welcome all!
Well I'm a Delta Gamma and I working on my crafting skills. I plan to do many crafts throughout my collegiate years and I thought if I described how to do them, it might help someone else. :)
First up is my initiation rose shadow box.
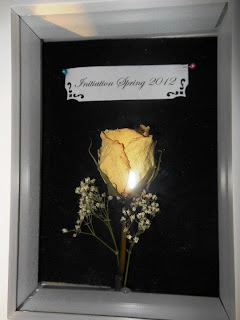
Need: shadow box, dried rose, paper, straight pins, hot glue & gun
I went to Hobby Lobby and got a small shadow box, I don't remember the dimensions though. I chose white to keep it simple.
Previously in this craft I had dried out my cream rose upside down with a bit of the baby's breath.
Then in a scripted font I printed off "Initiation Spring 2012" and used a edge stamp design to give it scalloped corners. Using pink and blue straight pins I pinned the paper to the back cover.
Barely letting the rose rest on the glass of box, I hot glued the cut stem of the rose to the box's bottom. After letting it dry and testing to make sure it was secure I but the cover back on and closed the little hinges. For added security I hot glued the hinges to the box.
And that's it! It was pretty simple but you have to have a bit of patience and be careful.
Take care,
Sarah
First up is my initiation rose shadow box.

Need: shadow box, dried rose, paper, straight pins, hot glue & gun
I went to Hobby Lobby and got a small shadow box, I don't remember the dimensions though. I chose white to keep it simple.
Previously in this craft I had dried out my cream rose upside down with a bit of the baby's breath.
Then in a scripted font I printed off "Initiation Spring 2012" and used a edge stamp design to give it scalloped corners. Using pink and blue straight pins I pinned the paper to the back cover.
Barely letting the rose rest on the glass of box, I hot glued the cut stem of the rose to the box's bottom. After letting it dry and testing to make sure it was secure I but the cover back on and closed the little hinges. For added security I hot glued the hinges to the box.
And that's it! It was pretty simple but you have to have a bit of patience and be careful.
Take care,
Sarah
Subscribe to:
Posts (Atom)