Tuesday, December 4, 2012

Do I see an Anchor on your tree?

It's Christmas time, which means how do I give presents to my 'family' members without going overboard - on price and items. I decided to make my own ornaments for my big, twin, and niece.

Originally I wanted to get larger ornaments than the ones I got and put charms particular of Delta Gamma and the person inside. Once I got to the store I realized that the number of charms I wanted and how much money I had wasn't going to work out.

So here is what I did get, it's all from Hobby Lobby.

Small clear ornaments, thin blue ribbon, anchor charms, bronze beads, pink pearls, and white pearls.

I tried to use an even amount of beads per ornament (I only made 3, if you want to make more then you definitely need to buy more pearls). There are many other options you can do for each sorority with color and charm variations.

These are filled ornaments. The one on the left is complete.
I looped the ribbon through the ornament, cut at whatever length you want. Then I slide the anchor charm down and tied the top.

It's a pretty easy gift idea for yourself or others and it literally took me less than 10 minutes to do. The hardest part was getting the ribbon through the anchor charm.

The ribbon spool was a good holder for the ornaments while I worked.

I also had leftover ribbon that I just filled another ornament til it was at a fullness that I liked. Since I wished I had a different ribbon, I didn't use it to make a loop. When I get home for the holidays I'll just find hook that isn't being used to hang it on the tree. I had one anchor charm left and I used the metal twist tie that kept the charms on the packaging to tie it to the top of the ornament.

Take care and do good for the holidays,
Sarah

Saturday, December 1, 2012

A Work in Progress

So I decided to start a cross stitch wall hanging for me or my future little. Too bad there aren't any good patterns that I could find. I did what my grandma does and got out some graft paper and a pretty image.

Here is what I want it too look like in the end
And here is what it looks like on the graft paper


...it has been a bit tedious transferring the words but I'm almost done with the pattern. Then I'll go to Hobby Lobby or some place like that to get blue thread and hopefully some tan or worn dotted fabric. I plan to use 3 threads for the outline of the letters and 2 threads for everything else.

I'll put up more pictures and tips as I work on this. I'm not a fast cross stitcher but I love it.

Take care and do good,
Sarah

Friday, October 26, 2012

10 Shirt Ideas I Want to Make

I know it's been a while, but hey - I'm in college and in a sorority, time can be limited. So I thought, why not write down my 10 top shirt ideas that I want to do...whenever I find time that is.

My mascot isn't cool but it
can work better for others
1. An anchor cut-out of a white shirt that has my school mascot sown over a pink short sleeve t-shirt. The anchor would be tilted a bit.

2. DG cut out from an anchor print, about 5 or so inches tall sown over a white short sleeve t-shirt. The letters would probably be at the bottom of the shirt on the right side.

3. Cut out DG from a blue fabric, then cut it out again only slightly larger from a pink fabric. Center the letters over each other, machine sew them on but hand sew over in a fun thread color.
4. Cut out 'I' '' and 'DeltaGam' from your favorite color or print. Sew it on in an 'I heart NYC' style or diagonal on to a shirt that goes well with your color/print. Maybe even an anchor on a back corner.

Purple and blue are my favorite colors
5. Take a size bigger striped shirt (I'm thinking blue and white?) and cut out a large large more decorative anchor out of a red fabric. Sew on the anchor towards the bottom right corner. Then cut the shirt into a one shoulder top and tie down the side opposite of the anchor.

6. Though this idea isn't entirely crafty and probably costs more than I'd like to think, but I've really wanted a razorback athletic shirt with Dembroidered on the back strap.

7. Another athletic shirt idea that is easier but I'm not sure how well it would hold up is getting an athletic shirt of your preference, buying iron-on letters and on the back bottom of the shirt spell Delta Gamma.

8. Similar to the I heart DeltaGam shirt, but instead of a heart some of my sisters have used a small anchor and always think it's so cute.

9. Recently some of my sisters also got a quarter-zip sweatshirt and cut out Dand an anchor out of Vera Bradley fabric. The letters were big and professionally sewed on the chest and the anchor was smaller and was sewn over their left shoulder/chest.

10. The name of my school is long and I've thought about cutting out DG over the title, spaced fairly close together. This would be similar to my first idea because I want a DG shirt but on game day I also want to support my school.

If you want you could even leave comments as to what idea you liked best/least or some color ideas.

Take care and do good,
Sarah

Monday, September 24, 2012

Painted D G letters

All of my sisters had taken on littles except me this fall so when they started crafting I wanted to join. I called it practice...by making things for myself. :)

Need: cardboard letters (about 1 cm thick), acrylic paint, thin and medium brushes, a swirly doodles stencil, fun stick on letter stencil, & stick on small pearls
(I got everything at Hobby Lobby)

First I mixed some white and purple paint to get a light purple color. I painted a layer over the top and along the inside edge. Then I added a bit more purple to my mix and painted the outside edge. To give the top some texture, when my brush was almost out of paint, I lightly brushed over the top. It could also be done with a sponge if you want.

Then I placed my stick on letter stencils where I wanted and traced it with a pencil. I used my straight purple color to paint within the lines.

I place the corner swirly stencil and traced it at the corners. I added some indigo paint to my purple to give it a lightly darker look.

I had the corner swirls be opposite


After letting it dry I added small pearls to the tips of the swirls. (Which you can't really see in the picture)

It took some time and a steady hand for when you paint in the lines, but I was very happy with my first try at making letters. It's very simple but is a little classy also.

Take care and do good,
Sarah

Friday, September 21, 2012

Welcome DG's! Welcome all!

Well I'm a Delta Gamma and I working on my crafting skills. I plan to do many crafts throughout my collegiate years and I thought if I described how to do them, it might help someone else. :)

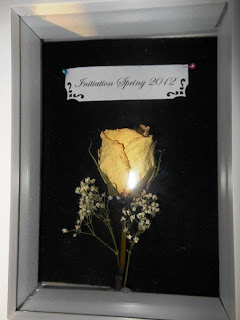
First up is my initiation rose shadow box.

Need: shadow box, dried rose, paper, straight pins, hot glue & gun

I went to Hobby Lobby and got a small shadow box, I don't remember the dimensions though. I chose white to keep it simple.

Previously in this craft I had dried out my cream rose upside down with a bit of the baby's breath.

Then in a scripted font I printed off "Initiation Spring 2012" and used a edge stamp design to give it scalloped corners. Using pink and blue straight pins I pinned the paper to the back cover.

Barely letting the rose rest on the glass of box, I hot glued the cut stem of the rose to the box's bottom. After letting it dry and testing to make sure it was secure I but the cover back on and closed the little hinges. For added security I hot glued the hinges to the box.

And that's it! It was pretty simple but you have to have a bit of patience and be careful.

Take care,
Sarah